Stop the Drip: Expert Guide to Fixing a Kitchen Sink Leaking Under Sink
Discovering a kitchen sink leaking under the sink is a common household headache. The telltale drip, drip, drip can signal a minor annoyance or a potentially serious plumbing issue leading to water damage and costly repairs. This comprehensive guide provides expert insights, practical solutions, and preventative measures to tackle a kitchen sink leaking under the sink, empowering you to diagnose, address, and prevent future leaks. We’ll walk you through identifying the source of the leak, the tools you’ll need, and step-by-step instructions to resolve the problem, saving you time, money, and potential water damage.
Understanding the Anatomy of a Kitchen Sink and its Plumbing
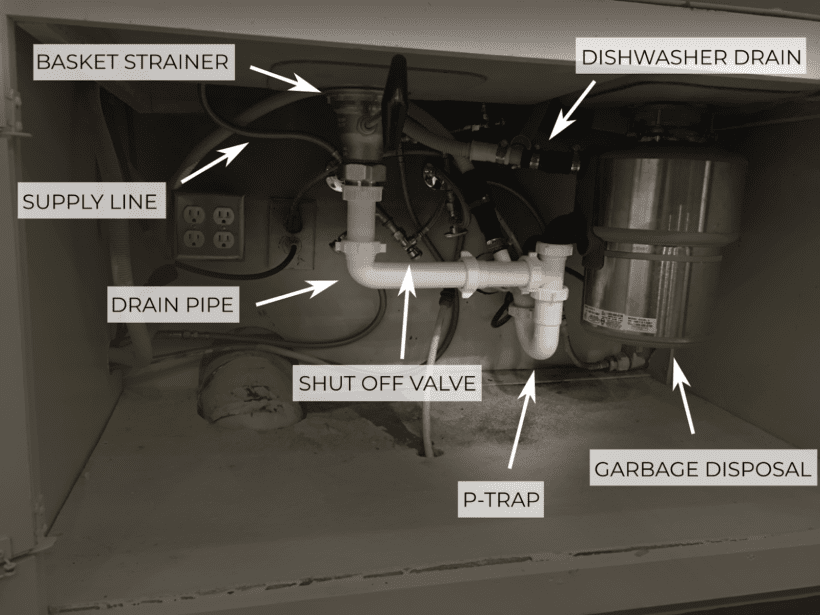
Before diving into leak diagnosis, it’s crucial to understand the basic components of your kitchen sink’s plumbing. Familiarizing yourself with these parts will make identifying the source of the leak much easier.
- Sink Basin: The visible bowl where you wash dishes.
- Drain Assembly: Connects the sink basin to the drainpipe. This includes the strainer basket, stopper, and flange.
- P-Trap: The curved pipe under the sink that traps debris and prevents sewer gases from entering your home.
- Drainpipes: Pipes that carry wastewater away from the sink. These can be made of PVC, copper, or other materials.
- Supply Lines: Flexible tubes that connect the shut-off valves to the faucet.
- Shut-Off Valves: Valves that control the water supply to the faucet. These are essential for turning off the water before making repairs.
- Faucet: The fixture that dispenses water into the sink.
- Sprayer Hose: A hose connected to the faucet for rinsing dishes.
Understanding how these components connect and function is the first step in tackling a kitchen sink leaking under sink.
Common Causes of a Kitchen Sink Leaking Under Sink
Pinpointing the exact cause of a kitchen sink leaking under sink is essential for effective repair. Here are some of the most common culprits:
- Loose Connections: Over time, connections between pipes, fittings, and fixtures can loosen due to vibration or temperature changes.
- Corroded Pipes: Corrosion can weaken pipes, leading to leaks, especially in older homes.
- Worn-Out Washers and O-Rings: These rubber components provide a watertight seal and can degrade over time, causing leaks around faucets and drains.
- Damaged P-Trap: Cracks or loose connections in the P-trap are a frequent source of leaks.
- Clogged Drains: Blockages can increase pressure in the pipes, leading to leaks at weak points.
- Faulty Faucet: Internal faucet components, such as cartridges or O-rings, can fail, causing leaks around the base of the faucet or from the spout.
- Deteriorating Sealant: The sealant around the sink basin can crack and dry out, allowing water to seep through.
- High Water Pressure: Excessively high water pressure can strain plumbing connections and contribute to leaks.
Identifying the specific cause will guide you towards the appropriate repair solution.
Step-by-Step Guide to Diagnosing a Kitchen Sink Leaking Under Sink
Before you grab your tools, a systematic diagnosis is crucial. Here’s how to pinpoint the source of the leak:
- Clear the Area: Remove everything from under the sink to provide a clear view of the plumbing.
- Dry the Area: Thoroughly dry all pipes, fittings, and the surrounding area with a clean cloth. This will make it easier to spot the source of the leak.
- Run the Water: Turn on the faucet and observe carefully. Check for leaks around the base of the faucet, the spout, and the supply lines.
- Fill the Sink: Plug the drain and fill the sink with water. Watch for leaks around the drain assembly and the sink basin.
- Check the Sprayer: Use the sprayer and inspect the hose and connections for leaks.
- Inspect the P-Trap: Carefully examine the P-trap for cracks or loose connections.
- Check for Condensation: In humid environments, condensation can mimic a leak. Make sure the water you’re seeing is actually a leak and not just condensation forming on cold pipes.
Use a flashlight to get a better view of hard-to-reach areas. Once you’ve identified the source of the leak, you can proceed with the appropriate repair.
Essential Tools and Materials for Fixing a Kitchen Sink Leaking Under Sink
Having the right tools and materials on hand will make the repair process much smoother. Here’s a list of essentials:
- Adjustable Wrench: For loosening and tightening nuts and fittings.
- Basin Wrench: Specifically designed for removing and installing faucet nuts in tight spaces.
- Pliers: For gripping and manipulating small parts.
- Screwdrivers (Phillips and Flathead): For removing and installing screws.
- Plumber’s Tape (Teflon Tape): For sealing threaded connections.
- Plumber’s Putty: For sealing around drain flanges and sink basins.
- Bucket: To catch water during repairs.
- Clean Cloths or Rags: For cleaning up spills and drying surfaces.
- Penetrating Oil: To loosen corroded nuts and bolts.
- Replacement Parts: Washers, O-rings, drain assemblies, or faucet cartridges, depending on the source of the leak.
- Safety Glasses: To protect your eyes from debris.
- Gloves: To protect your hands.
Before starting any repair, always turn off the water supply to the sink using the shut-off valves. If you don’t have shut-off valves, you’ll need to turn off the main water supply to your home.
Repairing Common Types of Kitchen Sink Leaks: A Practical Guide
Now that you’ve diagnosed the leak and gathered your tools, let’s tackle some common repairs:
1. Leaks Around the Faucet Base
Cause: Worn-out O-rings or sealant.
Solution:
- Turn off the water supply.
- Remove the faucet handle(s) and any decorative caps.
- Loosen the faucet mounting nut(s) from underneath the sink using a basin wrench.
- Carefully lift the faucet from the sink.
- Inspect the O-rings and replace them if they are worn or damaged.
- Clean the sink surface and apply a new bead of plumber’s putty around the base of the faucet.
- Reinstall the faucet and tighten the mounting nuts.
- Turn on the water supply and check for leaks.
2. Leaks from the Faucet Spout
Cause: Faulty faucet cartridge or valve.
Solution:
- Turn off the water supply.
- Remove the faucet handle(s) and any decorative caps.
- Identify the type of faucet cartridge (single-handle or two-handle).
- Remove the old cartridge using a screwdriver or pliers.
- Install the new cartridge, making sure it is properly aligned.
- Reinstall the faucet handle(s) and decorative caps.
- Turn on the water supply and check for leaks.
3. Leaks from the Supply Lines
Cause: Loose connections or damaged supply lines.
Solution:
- Turn off the water supply.
- Tighten the connections at both ends of the supply line using an adjustable wrench. Be careful not to overtighten.
- If the leak persists, replace the supply line with a new one.
- Apply plumber’s tape to the threaded connections before tightening.
- Turn on the water supply and check for leaks.
4. Leaks from the Drain Assembly
Cause: Loose connections, worn-out washers, or damaged drainpipe.
Solution:
- Turn off the water supply.
- Loosen the slip nuts connecting the drainpipe to the sink drain and the P-trap.
- Remove the drainpipe and inspect the washers. Replace any worn or damaged washers.
- Clean the threads on the drainpipe and apply plumber’s tape.
- Reassemble the drainpipe and tighten the slip nuts.
- If the drainpipe is damaged, replace it with a new one.
- Turn on the water supply and check for leaks.
5. Leaks from the P-Trap
Cause: Loose connections or cracks in the P-trap.
Solution:
- Place a bucket under the P-trap to catch any water.
- Loosen the slip nuts connecting the P-trap to the drainpipe and the sink drain.
- Remove the P-trap and inspect it for cracks.
- If the P-trap is cracked, replace it with a new one.
- Clean the threads on the drainpipe and apply plumber’s tape.
- Reassemble the P-trap and tighten the slip nuts.
- Turn on the water supply and check for leaks.
If you’re uncomfortable performing any of these repairs yourself, it’s always best to call a qualified plumber. Attempting repairs without the proper knowledge and skills can lead to further damage and more costly repairs down the line.
Preventative Measures to Avoid Future Leaks
Prevention is always better than cure. Here are some proactive steps you can take to minimize the risk of future leaks under your kitchen sink:
- Regular Inspections: Periodically check under your sink for any signs of leaks, corrosion, or loose connections. Early detection can prevent minor issues from escalating into major problems.
- Tighten Loose Connections: Regularly tighten any loose connections on pipes, fittings, and fixtures. Use an adjustable wrench, but be careful not to overtighten.
- Replace Worn-Out Parts: Replace worn-out washers, O-rings, and supply lines as needed. These parts are relatively inexpensive and easy to replace.
- Avoid Harsh Drain Cleaners: Harsh chemical drain cleaners can corrode pipes and damage seals. Instead, use a drain snake or a natural drain cleaner like baking soda and vinegar.
- Flush Drains Regularly: Flush your drains with hot water regularly to prevent clogs from forming.
- Install a Water Leak Detector: Consider installing a water leak detector under your sink. These devices can detect leaks early and alert you before they cause significant damage.
- Maintain Proper Water Pressure: Ensure that your home’s water pressure is within the recommended range (typically 40-60 psi). High water pressure can strain plumbing connections and contribute to leaks.
The Value of a Professional Plumber: When to Call for Help
While many minor leaks can be repaired with DIY methods, some situations require the expertise of a professional plumber. Consider calling a plumber if:
- You’re uncomfortable performing the repairs yourself.
- You’ve tried to fix the leak, but it persists.
- The leak is coming from a hidden or difficult-to-access area.
- You suspect a major plumbing problem, such as a burst pipe or a sewer line issue.
- You’re dealing with corroded pipes or damaged fixtures that require specialized tools or knowledge.
A qualified plumber can accurately diagnose the problem, perform the necessary repairs, and ensure that your plumbing system is functioning safely and efficiently. Ignoring plumbing issues can lead to significant water damage, mold growth, and costly repairs in the long run. According to a 2024 report by the EPA, even small leaks can waste significant amounts of water over time, highlighting the importance of prompt repair.
Expert Insights on Maintaining Your Kitchen Plumbing
Taking a proactive approach to kitchen plumbing maintenance can save you from future headaches and expenses. Addressing a kitchen sink leaking under sink promptly and employing preventative strategies are key. Regular inspections, gentle drain cleaning methods, and timely replacement of worn parts are all vital components of a sound maintenance plan. By staying vigilant and informed, you can ensure the longevity and efficiency of your kitchen plumbing system.
