Stop That Drip: Expert Guide to Fixing Leaks Under Your Kitchen Sink
A persistent drip under your kitchen sink is more than just an annoyance; it’s a sign of potential plumbing problems that can lead to water damage, mold growth, and wasted money. Addressing a dripping under kitchen sink promptly is crucial to prevent further complications and maintain a healthy home environment. This comprehensive guide provides expert insights, step-by-step instructions, and troubleshooting tips to help you identify the source of the leak and implement effective solutions. We’ll cover everything from identifying common culprits like loose connections and worn-out washers to more complex issues requiring specialized tools or professional assistance. Our goal is to empower you with the knowledge and confidence to tackle this common household problem effectively, saving you time, money, and the headache of dealing with water damage.
Understanding the Anatomy of Your Kitchen Sink Plumbing
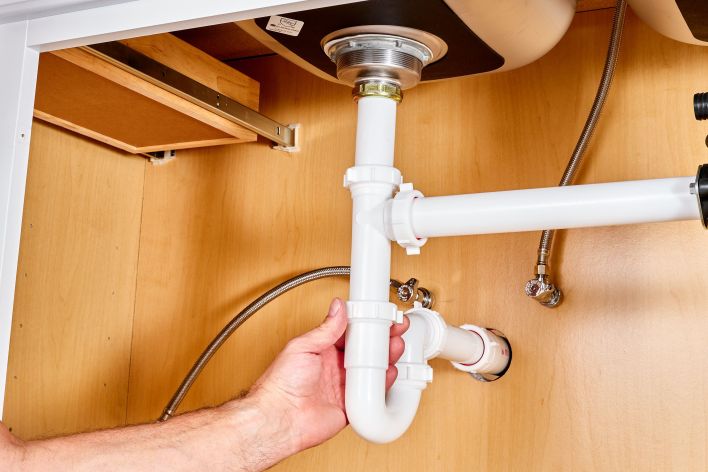
Before diving into troubleshooting, it’s essential to understand the components beneath your kitchen sink. Familiarizing yourself with these parts will make it easier to pinpoint the source of the leak.
- Supply Lines: These flexible tubes connect your water shut-off valves to the faucet. They carry both hot and cold water.
- Shut-Off Valves: Located beneath the sink, these valves control the water supply to the faucet. Knowing their location and how to use them is crucial in case of a leak.
- Faucet Body: The main structure of the faucet, housing the internal mechanisms that control water flow and temperature.
- Drain Pipes: A network of pipes that carry wastewater away from the sink. Common components include the tailpiece, P-trap, and drainpipe.
- P-Trap: The curved section of pipe under the sink that traps debris and prevents sewer gases from entering your home.
- Garbage Disposal (if applicable): An appliance that grinds food waste into small pieces for disposal down the drain.
Understanding the function of each component is the first step in diagnosing a dripping under kitchen sink. Leaks can occur at any of these points due to wear and tear, loose connections, or corrosion.
Common Causes of a Dripping Under Kitchen Sink
Several factors can contribute to a dripping under kitchen sink. Identifying the root cause is essential for implementing the correct fix. Here are some of the most frequent culprits:
- Loose Connections: Over time, connections between pipes and fittings can loosen due to vibrations, temperature changes, or physical impact.
- Worn-Out Washers and O-Rings: Faucets contain rubber washers and O-rings that create a watertight seal. These components can degrade over time, leading to leaks.
- Corroded Pipes: Older pipes, especially those made of metal, are susceptible to corrosion, which can create pinhole leaks or weaken connections.
- Damaged Supply Lines: Supply lines can become cracked, kinked, or corroded, resulting in leaks.
- Faulty Faucet Cartridge: Cartridge faucets use a cartridge to control water flow. A damaged or worn-out cartridge can cause drips.
- Clogged P-Trap: A blockage in the P-trap can cause water to back up and leak from connections.
- Garbage Disposal Issues: Leaks around the garbage disposal can be caused by loose connections, damaged seals, or a cracked disposal unit.
Pinpointing the exact source of the dripping under kitchen sink is crucial before attempting any repairs. A careful inspection, aided by a flashlight and some paper towels, can help you identify the origin of the leak.
The Plumber’s Secret Weapon: Plumber’s Putty
Plumber’s putty is a soft, pliable sealant used to create watertight seals around drains, faucets, and other plumbing fixtures. It’s an essential tool for any DIY plumber tackling a dripping under kitchen sink. Plumber’s putty doesn’t harden or shrink, making it ideal for creating flexible, long-lasting seals. It’s easy to apply and remove, making it a convenient option for various plumbing repairs. However, it’s important to note that plumber’s putty is not a substitute for Teflon tape or pipe dope, which are used to seal threaded pipe connections.
Step-by-Step Guide to Diagnosing and Fixing a Dripping Under Kitchen Sink
Follow these steps to diagnose and fix a dripping under kitchen sink. Remember to always turn off the water supply before starting any repairs.
- Prepare the Area: Clear the space under the sink and place a bucket or container to catch any dripping water.
- Turn Off the Water Supply: Locate the shut-off valves under the sink and turn them clockwise to stop the water flow. If you don’t have shut-off valves, you’ll need to turn off the main water supply to your house.
- Dry the Area: Use paper towels to dry all the pipes, connections, and surrounding surfaces. This will make it easier to spot the source of the leak.
- Inspect for Leaks: Carefully examine each connection, pipe, and fitting for signs of water. Look for drips, wet spots, or mineral buildup.
- Tighten Connections: If you find a loose connection, use a wrench to gently tighten the fitting. Be careful not to overtighten, as this can damage the pipes.
- Replace Washers and O-Rings: If the leak is coming from the faucet, disassemble the faucet and inspect the washers and O-rings. Replace any worn or damaged components.
- Repair or Replace Damaged Pipes: If you find a corroded or damaged pipe, you may need to repair it with a pipe repair kit or replace the entire section of pipe.
- Check the P-Trap: If the P-trap is clogged, remove it and clean out any debris.
- Inspect the Garbage Disposal: If the leak is coming from the garbage disposal, check the connections and seals. You may need to replace the disposal unit if it’s cracked or damaged.
- Test Your Repairs: Once you’ve made the necessary repairs, turn the water supply back on and check for leaks. If the dripping persists, repeat the inspection process to identify any remaining issues.
Essential Tools and Materials for Fixing a Leaky Sink
Having the right tools and materials on hand can make the repair process much smoother. Here’s a list of essential items:
- Wrenches: Adjustable wrench, pipe wrench, and basin wrench
- Screwdrivers: Phillips head and flat head screwdrivers
- Pliers: Slip-joint pliers and needle-nose pliers
- Plumber’s Putty: For sealing drains and faucets
- Teflon Tape: For sealing threaded pipe connections
- Replacement Washers and O-Rings: Assorted sizes for faucets and valves
- Pipe Repair Kit: For repairing small leaks in pipes
- Bucket or Container: To catch dripping water
- Paper Towels: For drying surfaces and cleaning up spills
- Flashlight: For inspecting hard-to-reach areas
When to Call a Professional Plumber
While many dripping under kitchen sink issues can be resolved with DIY repairs, some situations require the expertise of a professional plumber. Consider calling a plumber if:
- You’re uncomfortable working with plumbing.
- You can’t identify the source of the leak.
- The leak is severe or causing significant water damage.
- You suspect a major plumbing problem, such as a burst pipe.
- You’ve tried DIY repairs without success.
Hiring a qualified plumber can save you time, money, and potential headaches in the long run. They have the experience and tools to diagnose and fix complex plumbing problems efficiently and effectively.
Preventing Future Leaks: Proactive Maintenance Tips
Preventing leaks is always better than dealing with the aftermath. Here are some proactive maintenance tips to help keep your kitchen sink plumbing in good condition:
- Regular Inspections: Periodically inspect the pipes, connections, and fittings under your sink for signs of leaks or corrosion.
- Tighten Loose Connections: If you notice any loose connections, tighten them gently with a wrench.
- Replace Worn Washers and O-Rings: Replace worn washers and O-rings in your faucets and valves to prevent leaks.
- Avoid Harsh Chemicals: Avoid pouring harsh chemicals down the drain, as they can corrode pipes and damage seals.
- Flush the Drain Regularly: Flush the drain with hot water regularly to prevent clogs and buildup.
- Be Mindful of What Goes Down the Drain: Avoid putting grease, coffee grounds, and other debris down the drain, as they can cause clogs.
The Importance of High-Quality Faucets and Fixtures
Investing in high-quality faucets and fixtures can significantly reduce the risk of leaks and other plumbing problems. Look for faucets made from durable materials, such as solid brass or stainless steel. Choose fixtures with reliable seals and connections. While high-quality fixtures may cost more upfront, they can save you money in the long run by reducing the need for repairs and replacements.
Understanding Water Pressure and Its Impact on Leaks
Excessive water pressure can put stress on your plumbing system, leading to leaks and other problems. If your water pressure is too high, consider installing a pressure regulator to reduce the pressure to a safe level. A pressure regulator can help protect your pipes, fixtures, and appliances from damage caused by high water pressure.
The Environmental Impact of Leaky Faucets
A dripping under kitchen sink may seem like a minor issue, but it can waste a significant amount of water over time. Even a small drip can add up to gallons of wasted water each day. Fixing leaks promptly can help conserve water and reduce your water bill. It’s also an environmentally responsible practice that helps protect our precious water resources.
Choosing the Right Plumber: Credentials and Expertise
When hiring a plumber, it’s essential to choose someone with the right credentials and expertise. Look for plumbers who are licensed and insured. Ask about their experience with fixing leaks under kitchen sinks. Check online reviews and ask for references. A reputable plumber will be able to diagnose and fix your plumbing problem efficiently and effectively.
Troubleshooting Garbage Disposal Leaks
Leaks originating from the garbage disposal present unique challenges. Often, these leaks stem from a loose connection between the disposal unit and the sink flange. Other times, the internal seals within the disposal unit itself have failed. Before attempting any repairs, always disconnect the power to the disposal to prevent accidental injury. Carefully inspect the mounting assembly, hose connections, and the body of the disposal for cracks or damage. If the disposal unit is old or significantly corroded, replacement might be the most cost-effective solution. Remember to consult the manufacturer’s instructions for specific troubleshooting steps and safety precautions.
Fixing That Drip: A Path to Savings and a Dry Kitchen
Addressing a dripping under kitchen sink promptly is an investment in your home’s health and your financial well-being. By understanding the common causes of leaks, following our step-by-step guide, and maintaining your plumbing system, you can prevent costly water damage and conserve precious water resources. Whether you choose to tackle the repair yourself or enlist the help of a professional plumber, taking action is crucial to stop that drip and ensure a dry, problem-free kitchen. Don’t delay – a small drip today can turn into a major headache tomorrow.
