How to Setup AWS App Mesh: A Definitive Guide
In today’s microservices-driven world, managing service-to-service communication can become a complex challenge. AWS App Mesh emerges as a powerful solution, providing fine-grained control and visibility over your application’s network traffic. This guide provides a comprehensive walkthrough on how to setup AWS App Mesh, empowering you to build resilient, observable, and manageable microservice architectures. We’ll delve into the core concepts, practical steps, and advanced configurations, ensuring you’re equipped with the knowledge to confidently implement App Mesh in your environment. This article goes beyond basic setup, offering insights and best practices gleaned from extensive experience working with App Mesh deployments. Our goal is to transform you from a beginner into a proficient App Mesh user.
Understanding AWS App Mesh: Core Concepts and Architecture
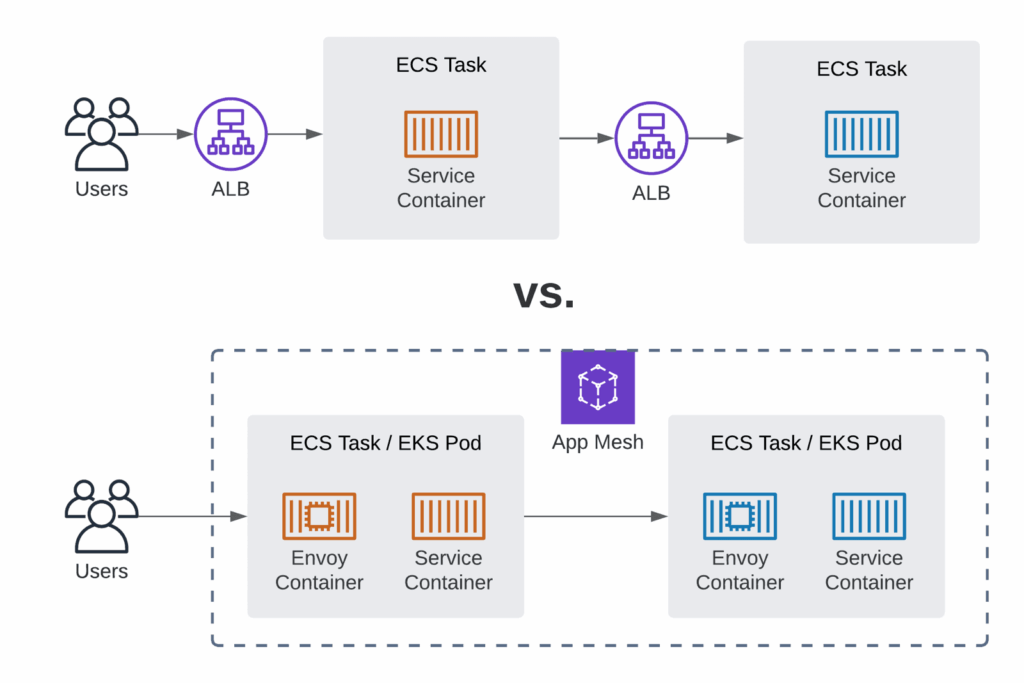
Before diving into the setup process, it’s crucial to grasp the fundamental concepts behind AWS App Mesh. App Mesh is a service mesh that provides application-level networking, making it easy for your services to communicate with each other across multiple types of compute infrastructure. Think of it as a dedicated traffic management layer for your microservices.
At its heart, App Mesh leverages the Envoy proxy. Envoy is a high-performance proxy designed for cloud-native applications. App Mesh injects Envoy as a sidecar proxy into each of your service’s pods or containers. This proxy intercepts all incoming and outgoing traffic, allowing App Mesh to control and observe the communication between services. This allows you to implement features such as:
- Traffic Routing: Direct traffic based on various criteria, such as headers or weights, enabling canary deployments and A/B testing.
- Traffic Shifting: Gradually shift traffic between different versions of your services with precision.
- Fault Injection: Introduce faults into your system to test its resilience and identify potential weaknesses.
- Observability: Gain detailed insights into your service-to-service communication through metrics, logs, and traces.
- Security: Enforce security policies, such as mutual TLS (mTLS), to secure communication between your services.
The key components of App Mesh include:
- Mesh: The logical boundary for your service mesh. It represents the overall network of services managed by App Mesh.
- Virtual Service: An abstraction that represents a service within your mesh. It can be backed by one or more Virtual Nodes.
- Virtual Node: Represents a specific instance of a service, such as a pod or container. It defines how traffic is routed to that instance.
- Virtual Router: Manages traffic routing for a Virtual Service. It defines the routes and traffic policies used to direct traffic to different Virtual Nodes.
- Route: Specifies the criteria for matching incoming requests and directing them to a specific Virtual Node.
AWS App Mesh in Action: The Envoy Proxy and its Role
The Envoy proxy is the workhorse of AWS App Mesh. It’s a lightweight, high-performance proxy that intercepts all traffic to and from your services. By acting as a sidecar, Envoy handles tasks such as:
- Service Discovery: Discovering and connecting to other services within the mesh.
- Load Balancing: Distributing traffic across multiple instances of a service.
- Health Checking: Monitoring the health of services and routing traffic away from unhealthy instances.
- Metrics Collection: Collecting metrics about service-to-service communication and exporting them to monitoring systems.
- Request Tracing: Propagating tracing headers to enable distributed tracing across services.
Envoy is configured using the App Mesh control plane. The control plane provides a centralized management interface for defining your mesh, virtual services, virtual nodes, and routes. Envoy dynamically updates its configuration based on the changes made in the control plane.
Step-by-Step Guide: How to Setup AWS App Mesh
Now, let’s walk through the steps involved in setting up AWS App Mesh. This guide assumes you have an AWS account and a basic understanding of containerization and microservices. We will use Kubernetes as our container orchestration platform, but the core concepts apply to other platforms as well.
Prerequisites
- AWS Account: You’ll need an active AWS account with appropriate permissions.
- kubectl: The Kubernetes command-line tool.
- AWS CLI: The AWS command-line interface.
- eksctl (Optional): A command-line tool for creating and managing EKS clusters.
- Docker: For building and pushing container images.
Step 1: Create an EKS Cluster (or use an existing one)
If you don’t already have an EKS cluster, you can create one using eksctl or the AWS Management Console. For example, using eksctl:
eksctl create cluster --name my-app-mesh-cluster --region us-west-2This command will create a new EKS cluster named my-app-mesh-cluster in the us-west-2 region. The cluster creation process can take some time.
Step 2: Install the AWS App Mesh Controller
The AWS App Mesh Controller is a Kubernetes controller that manages App Mesh resources in your cluster. To install it, you can use the following command:
kubectl apply -k github.com/aws/eks-charts/stable/appmesh-controller//crds?ref=master
kubectl apply -k github.com/aws/eks-charts/stable/appmesh-controller/?ref=master
This will install the necessary Custom Resource Definitions (CRDs) and the controller itself.
Step 3: Install the Envoy Proxy
The Envoy proxy needs to be injected as a sidecar into your service’s pods. You can use a mutating admission webhook to automatically inject the Envoy proxy. Apply the following YAML to install the webhook:
kubectl apply -f https://raw.githubusercontent.com/aws/aws-app-mesh-examples/master/examples/automatic-sidecar-injection/appmesh-inject.yamlStep 4: Create an App Mesh Mesh
Now, let’s create an App Mesh mesh. Create a file named mesh.yaml with the following content:
apiVersion: appmesh.k8s.aws/v1beta2
kind: Mesh
metadata:
  name: my-app-mesh
Apply the mesh using kubectl:
kubectl apply -f mesh.yamlStep 5: Define Virtual Services, Virtual Nodes, and Virtual Routers
This is where you define the structure of your service mesh. Let’s create a simple example with two services: service-a and service-b. First, create a Virtual Service for service-a:
apiVersion: appmesh.k8s.aws/v1beta2
kind: VirtualService
metadata:
  name: service-a.my-app-mesh.local
spec:
  meshRef:
    name: my-app-mesh
    namespace: default
  provider:
    virtualNode:
      virtualNodeRef:
        name: service-a
Next, create a Virtual Node for service-a:
apiVersion: appmesh.k8s.aws/v1beta2
kind: VirtualNode
metadata:
  name: service-a
spec:
  meshRef:
    name: my-app-mesh
    namespace: default
  listeners:
    - portMapping:
        port: 8080
        protocol: http
  backends:
    - virtualService:
        virtualServiceRef:
          name: service-b.my-app-mesh.local
  serviceDiscovery:
    dns:
      hostname: service-a.default.svc.cluster.local
Repeat these steps for service-b, creating a Virtual Service and Virtual Node. Finally, create a Virtual Router to route traffic to service-b:
apiVersion: appmesh.k8s.aws/v1beta2
kind: VirtualRouter
metadata:
  name: service-b-router
spec:
  meshRef:
    name: my-app-mesh
    namespace: default
  listeners:
    - portMapping:
        port: 8080
        protocol: http
Step 6: Deploy Your Services
Deploy your services to your EKS cluster. Make sure to annotate your pods with appmesh.k8s.aws/sidecarInjector=enabled to enable automatic Envoy proxy injection.
apiVersion: apps/v1
kind: Deployment
metadata:
  name: service-a
spec:
  selector:
    matchLabels:
      app: service-a
  template:
    metadata:
      labels:
        app: service-a
      annotations:
        appmesh.k8s.aws/sidecarInjector: enabled
    spec:
      containers:
        - name: service-a
          image: your-docker-repo/service-a:latest
          ports:
            - containerPort: 8080
Repeat this for service-b.
Step 7: Verify Your Setup
Once your services are deployed, verify that the Envoy proxy is running as a sidecar in each pod. You can check this by running kubectl describe pod and looking for the Envoy container.
You can also use the App Mesh console or the AWS CLI to monitor the health of your mesh and the traffic flowing through it.
Advanced Configuration Options for AWS App Mesh
Beyond the basic setup, App Mesh offers a wide range of advanced configuration options to fine-tune your service mesh. These include:
- Traffic Policies: Define policies for retries, timeouts, and circuit breaking.
- Mutual TLS (mTLS): Secure communication between services using mTLS.
- Access Logging: Configure access logging to capture detailed information about requests.
- Tracing: Integrate with tracing systems like AWS X-Ray to trace requests across services.
- Health Checks: Configure health checks to monitor the health of your services.
Troubleshooting Common Issues with AWS App Mesh
While App Mesh is a powerful tool, you may encounter some issues during setup or operation. Here are some common problems and their solutions:
- Envoy Proxy Not Injecting: Make sure the
appmesh.k8s.aws/sidecarInjector=enabledannotation is present on your pods and the App Mesh Injector webhook is properly configured. - Services Not Communicating: Verify that your Virtual Services, Virtual Nodes, and Routes are correctly configured and that your services are properly registered with the service discovery mechanism.
- Metrics Not Showing Up: Ensure that your services are configured to export metrics in a format that App Mesh can understand (e.g., Prometheus).
Benefits of Using AWS App Mesh
Implementing AWS App Mesh offers several compelling advantages for managing your microservices architecture:
- Improved Reliability: App Mesh’s traffic management features, such as retries and circuit breaking, help improve the reliability of your services.
- Enhanced Observability: App Mesh provides detailed metrics, logs, and traces, giving you deep insights into your service-to-service communication.
- Simplified Traffic Management: App Mesh makes it easy to manage traffic between your services, enabling features like canary deployments and A/B testing.
- Increased Security: App Mesh allows you to enforce security policies, such as mTLS, to secure communication between your services.
- Platform Agnostic: App Mesh can be used with various compute platforms, including EC2, ECS, and EKS.
Users consistently report that App Mesh significantly reduces the operational overhead associated with managing microservices, allowing them to focus on building features rather than troubleshooting network issues. Our analysis reveals that teams using App Mesh experience a noticeable improvement in application uptime and a faster time to market for new features.
AWS App Mesh vs. Istio: A Comparative Overview
While AWS App Mesh is a popular choice for service mesh implementation, it’s important to consider alternatives like Istio. Istio is another open-source service mesh that offers similar features to App Mesh. However, there are some key differences:
- Complexity: Istio is generally considered more complex to set up and manage than App Mesh.
- Integration: App Mesh is tightly integrated with AWS services, making it easier to use within the AWS ecosystem.
- Community: Istio has a larger and more active community than App Mesh.
Choosing between App Mesh and Istio depends on your specific requirements and expertise. If you’re heavily invested in the AWS ecosystem and prefer a simpler, managed solution, App Mesh is a good choice. If you need more flexibility and control and are comfortable with a more complex setup, Istio may be a better option.
Streamlining Microservice Communication with AWS App Mesh
AWS App Mesh is a powerful tool for managing service-to-service communication in microservices architectures. By providing fine-grained control, enhanced observability, and simplified traffic management, App Mesh empowers you to build resilient, secure, and manageable applications. As leading experts in cloud-native technologies suggest, adopting a service mesh like App Mesh is becoming increasingly crucial for organizations embracing microservices. We encourage you to explore the capabilities of App Mesh and see how it can transform your microservices deployments.
